DIY Captioning Your Vimeo Videos
When captioning, we've found the process of creating quality captions to be easier if we did our transcription and initial caption formatting work in Word. Transcripts should record verbatim what is said, identify speakers, and identify important sound effects. It's best if the transcripts are as grammatically correct as possible too.
- Speaker identification goes in parentheses ( ).
- Sound effects go in brackets [ ].
- Corrections to audio should be in brackets [ ].
- Interruptions should be indicated by -- or —.
Once the transcript is complete, we put the entire transcript into a monospace font such as Courier New and then adjusted the document margins so that there were only 32 characters per line (which is part of DCMP's captioning Links to an external site. requirements). You can copy-paste the string of numbers below into your word document, give them the same font and size as the rest of the document, and then place the right margin just after the 32.
02 05 08 11 14 17 20 23 26 29 32
From there, use the enter key once to create new lines within a caption and use the enter key twice to create new captions. By the end, your document should look like this:
Hi, I'm a single-line caption.
This is a two-line caption.
See? Here's the second line.
This is a third caption,
and it also has two lines.
When subdividing the transcript into this format, do your best to follow these DCMP Links to an external site. rules to make reading easier (particularly the first two):
- Unless one of the sentences is short (like one or two words) don't end one sentence and start another on the same line.
- Do not end a line or caption on a conjunction (For, And, Nor, But, Or, Yet, So).
- Try to not split people's names or titles across lines or captions.
- Try to not have modifying words on one line or caption and the word it modifies on another.
- Try to not split prepositional phrases across lines or captions.
- Try to not have auxiliary verbs on one line or caption and the verb it modifies on another.
Once finished, save the document as a Plain Text or .txt file. If a File Conversion window appears, set the text encoding to Other and then Unicode and check the Allow character substitution box (If you don't, you may need to replace apostrophes, quotation marks, and some additional punctuation later).
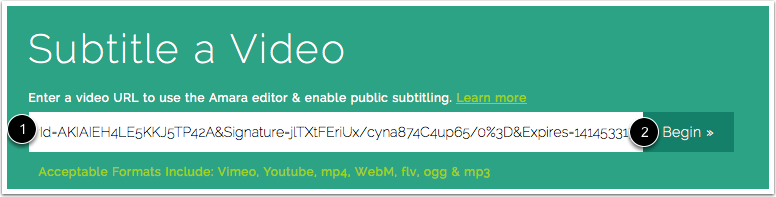
After the transcript has been saved as a .txt file, copy the original video's URL and then open a new tab to Amara.org. Login or create an Amara account and then click the Subtitle Video link. In the field provided on the new page, paste the URL (1) then click the Begin button (2). This will navigate you to a new page.
On the next page, in the middle of the sidebar that's to the left of the video player, check that there isn't a set of captions already for your video. If you were going to provide English captions and someone has already added English subtitles or captions, then you should see a link that says English beneath the [#] Languages section. Watch the video to determine if the captions are adequate. If they aren't, click the language (i.e. English) link (1) and then click the Edit Subtitles link in the upper right of the page to the right of the Download drop menu.
If there is no subtitles or captions (as evidenced by the lack of a Languages section) or if subtitles or captions that have been provided are not in the language you wish to provide, click Add a new language!

A pop-up will appear where you need to indicate the language of the audio and the language of your captions. After you click Continue, you will finally be in the Amara caption editor. In the editor, hover on the Tools button which has a wrench icon (1) and then select Upload subtitles (2) from the drop menu. In the pop-up that appears, use the Choose File button to select your .txt transcript file and then click the Upload button. Review the transcript in the bottom middle panel then, when satisfied, click the Yes, start syncing button (3).
Next, use the controls listed in the top left panel or use your mouse and the timeline that appears between the top and bottom rows of panels to set the timings.
Make sure to have a caption at the very beginning of your video (even if it says [silence] or [music]). Also, try to make your captions appear within half a second of when the corresponding sound starts.
Video: Amara Syncing Process
Links to an external site.
How to Sync Captions - Written instructions Links to an external site.
Once you have set the timings, click the Start Reviewing button in the top right panel. Play the video and check your work. Also look in the bottom middle panel for red exclamation marks on the right side of caption boxes. These exclamation marks can mean that there are too many lines in a single caption, too much text on a single line, or that the duration of the caption is too short to be read. Out of the three, the last should be the most common for you. To correct the reading rate error, play with the caption duration. You may need to stretch the earlier mentioned 1/2 a second rule to make it work. If the speech is too fast for there to be any adjusting, you can edit the caption to summarize what's being said.
When finished reviewing, click the Complete or Publish button in the top right panel. This will bring you back to the video page.
Now, you'll need to download the caption file. In the sidebar to the left of the video, below Language, select the language of captions you've been creating (generally, this will be English) (1). In the top right of the Subtitles tab and to the left of the Edit Subtitles link, click the Download drop menu (2). In the drop menu, select SRT (3) then save the file.
Once you've downloaded the caption file, go back to Vimeo and login. Click the My Videos tab (1) and then click the Settings or gear icon button (2) in the top left of the original video.
On the Settings page, click the Advanced link (1) in the left sidebar below the video player. When the page reloads, click the Choose File button (2) and select the SRT file you previously downloaded from Amara. When it uploads, look below the Choose file button, update the caption details (language and type) and check the Status checkbox to publish the captions (3).
When ready, click the Save Changes button at the bottom of the page. Then, Congratulations! Your Vimeo video has captions!
Return to Videos Should Have Captions.
Guides
Illustrated Guides
Last Updated Fall 2016